Before you can send and receive mail, the program needs to know your e-mail address and the addresses of the SMTP and POP3 or IMAP servers assigned to your e-mail account. This information is provided to you by the people/company or service that provides your email. You cannot "wing" or guess at this information. It must be correct and must match they exact setting your provider requires for this to work. So, if you do not know the answers these questions, you can either look at the account settings in your old email software or you can call your internet provider and ask them.
If you are not sure about the answers to the above questions ask your Internet Provider. Answers to the questions should be supplied by your ISP when you first sign up for an account. Alternatively, if you have previously used another e-mail program that is still installed on your system you can check under its settings for the answers to these questions.
Once you have determined the answers to these basic question you are now ready to go to the "Tools" menu at the top of the program and select the menu item for "Mail Accounts" . When you click to Add a new account, here are the screens you will see:
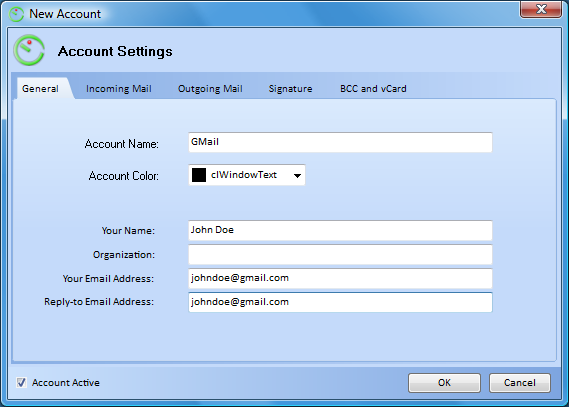
The Account Name field is like a nickname you give to this account. The name you type in here is just for your own information and is a useful way to tell accounts apart if you have more than one.
Account Color is also useful for multiple accounts. This color will be the text color in the list of messages for email using this account, which makes it easy to see at a glance which messages are related to which email account.
Your Name is how other will see you identified on mail they receive from you.
Organization is optional and can be used for a Company Name.
Your Email Address and Reply-to Email Address are usually the same and are the email address that others will see your messages as having come from.
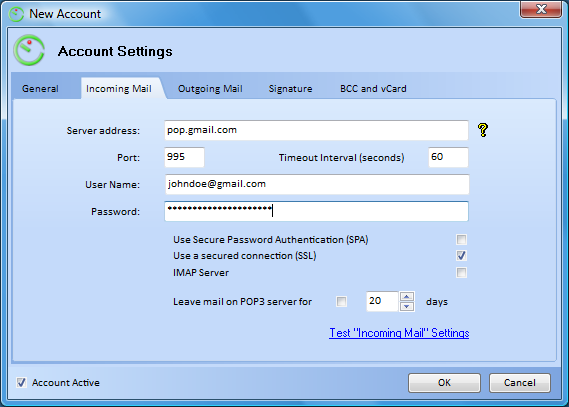
Here is where you get to start using the answers you got from your email provider. If you have a popular provider, try the "?" button on the right of the Server address. If your provider is listed, you can click on it to have many of these fields filled out for your automatically.
If you provider is not on the list, you'll need to fill this information out on your own. Enter the server name your email provider gave you. If they gave you a different Port, you can change it, but if they didn't say anything about the Port, then leave the default value of 110.
Timeout Interval can usually be left alone, set to 60 seconds. If you know you have a particularly slow-to-respond mail provider, you can lengthen this time to 120, but this is not necessary for most users.
User Name and Password are the fields that prove you deserve access to your incoming mail messages. (For some providers, User Name can be the complete email address, not just the part before the @ symbol.)
Intellect supports both POP3 and IMAP servers for incoming mail. If your mail server is IMAP based, don't forget to check the IMAP Server checkbox to let the program know!
A quick note about "Leave mail on POP3 server...": We do NOT recommend using this option unless you have a very good reason. Why? Intellect has better options to help you keep the same messages on multiple computers. Turning this option on when you don't need it can only hurt your performance and slow you down!
Notice the Account Active checkbox in the lower left? Keeping this box checked means this account will be included when Intellect checks for mail, both incoming and outgoing.
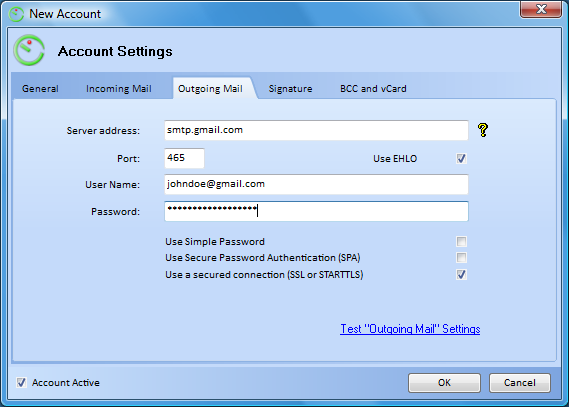
As with the incoming mail settings, if you have a popular provider, try the "?" button on the right of the Server address. If your provider is listed, you can click on it to have many of these fields filled out for your automatically.
If you provider is not on the list, you'll need to fill this outgoing information out on your own. Enter the outgoing server name your email provider gave you. Many outgoing mail servers are slightly different from the incoming ones, so double-check you have the correct Server Name/address.
Keep the box for "Use EHLO" checked! It is only in rare cases where this option is not needed!
If your ISP wants you to login to "authenticate" yourself before sending messages, there are fields for User Name and Password, along with a few checkboxes for the style of authentication to be used.
TIP: If you are switching from Outlook (or working from instructions from your ISP for Outlook Users), Outlook has an option under Outgoing Mail Server which says something like "My server requires authentication". This checkbox in Outlook would be the equivalent of the "Use Simple Password" checkbox in Intellect.
Signatures are completely optional, but they can be a great time saver if you use (or want to use) the same closing to any email you send from this account. Take a look at this screen shot as an example of you might use this area to your advantage:

If you would like to add images to your signature or perhaps change the font color and style, Intellect provides an easy way for getting this done.
The signature area supports HTML code. If you are familiar with HTML you can type the code directly into the signature area.
But the good news is, you do not need to know any HTML coding and still take advantage of this functionality. By creating the desired signature in a new message with all images and formatting, you can then select that block of text and click on Edit and Copy HTML. This will copy the code behind what you created. This copied code can then be pasted directly into this signature tab of your account settings.
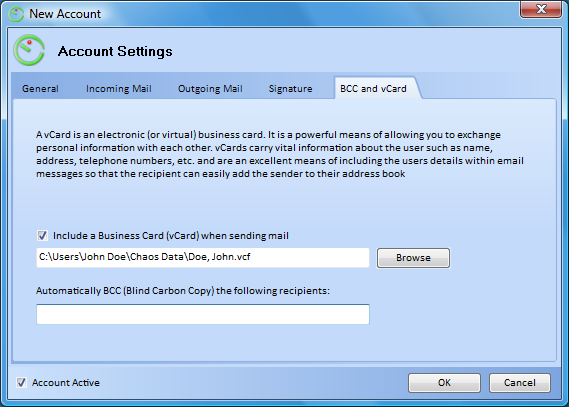
Like the signature settings, the options on this screen are completely optional.
vCards offer you a way to attach an "electronic business card" to your outgoing messages. A vCard can make it easy for the people to add you to their contact manager software when they get mail from you.
The BCC settings will automatically send a copy of all your outgoing email addresses to the person of your choice. (You wouldn't use this for your own email address, though, as we keep your outgoing messages automatically in a folder for Sent Mail.)
This help article applies to Intellect 3